 English
 French
 German
 Italian
 Polish
 Russian
 Spanish
How to Refill a Vape Tank or Pod: A Beginner’s Guide
Refillable vape tanks and pod systems allow adult users to choose from a wider range of e-liquids while continuing to use the same device. Compared with replacing an entire single-use vape, refilling a tank or pod can also reduce battery waste and lower long-term product costs.
The process is generally straightforward, but beginners can encounter leaking, spilling, burnt coils and unwanted flavour mixing if the device is filled incorrectly.
This guide explains how to refill top-fill tanks, bottom-fill tanks and refillable vape pods. It also covers coil priming, tank cleaning, leak prevention and the most common refilling mistakes.
Important: Vape products containing nicotine are intended only for adults of legal purchasing age. Nicotine is addictive. Always follow the instructions supplied by the device and e-liquid manufacturer.
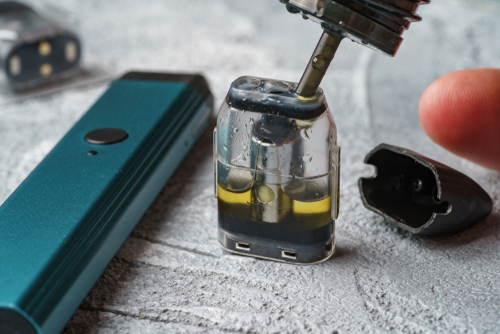
Quick Answer: How Do You Refill a Vape?
To refill a vape, turn off the device, remove or open the tank or pod, locate the correct e-liquid filling port and slowly add compatible e-liquid. Avoid the central airflow tube and do not fill above the maximum line. Close the port securely and allow a new coil to soak for five to ten minutes before vaping.
What Do You Need to Refill a Vape?
Before beginning, prepare the following items:
- A refillable vape tank or refillable pod
- Compatible e-liquid
- A replacement coil if the current one is worn out
- Paper towels or clean tissues
- The manufacturer’s instruction manual
- A clean, flat working surface
Check the e-liquid bottle for damage before opening it. The nozzle should be narrow enough to fit comfortably into the device’s filling port.
Keep all e-liquids away from children and pets. If e-liquid comes into contact with your skin, wash the affected area promptly according to the instructions on the product label.
Is Your Vape Pod Actually Refillable?
Not every pod is designed to be opened and refilled.
Vape pods generally fall into three categories:
| Pod type | Can it be refilled? | What the user replaces |
|---|---|---|
| Prefilled closed pod | No | Entire pod |
| Refillable pod with built-in coil | Yes | Entire pod when coil wears out |
| Refillable pod with replaceable coil | Yes | E-liquid and separate coil |
Do not attempt to force open, puncture or modify a sealed prefilled pod. Doing so can cause leaking, damage the device and expose the user to concentrated e-liquid.
Look for a rubber filling plug, sliding top cap or clearly marked filling port. If no refill opening is shown in the instructions, the pod is probably not refillable.
When Should You Refill a Vape Tank or Pod?
It is better to refill a vape before the chamber becomes completely empty.
Most transparent tanks and pods allow users to check the e-liquid level directly. Refill the chamber when the liquid approaches the manufacturer’s minimum line or when the wicking openings are no longer fully covered.
Possible signs that the liquid level is too low include:
- Reduced vapour production
- Weaker or inconsistent flavour
- A dry sensation when inhaling
- Visible wick openings above the liquid
- A dry or burnt taste
Stop using the device immediately if it tastes burnt. Continuing to vape may damage the coil and wick. Adding e-liquid cannot always repair a coil that has already burned, so a replacement may be necessary.
Important Checks Before Refilling
A few simple checks can prevent most refill-related problems.
Turn Off the Device
Switch off the vape before removing its tank, opening the filling system or handling the coil.
Many devices can be turned off by pressing the power button several times quickly. Check the manual because the exact control sequence varies between models.
Check the Coil
Inspect the coil or pod for signs of wear. Replace it if you notice:
- A persistent burnt taste
- Dark or discoloured wick material
- Significant flavour loss
- Unusual gurgling that cleaning does not resolve
- E-liquid leaking around the coil
- A coil that has exceeded its normal service life
Make sure the coil is correctly installed. A loose or misaligned coil is a common cause of leaking.
Confirm E-Liquid Compatibility
Different vape systems are designed for different e-liquid formulations.
Compact pod systems and mouth-to-lung devices commonly use thinner e-liquids, while higher-powered sub-ohm tanks may require thicker, higher-VG liquids.
Using an unsuitable liquid can lead to:
- Dry hits
- Flooded coils
- Leaking
- Weak vapour
- Reduced coil life
Follow the device or coil manufacturer’s recommended VG/PG range and power settings.
How to Refill a Top-Fill Vape Tank
Top-fill tanks are among the easiest refillable systems to use. The filling port is located beneath a removable, sliding or rotating top cap.
Step 1: Turn Off the Vape
Switch off the device and place it upright on a stable surface. Depending on the design, you may leave the tank attached to the mod or remove it before filling.
There is usually no need to remove the coil during a normal refill.
Step 2: Open the Top Cap
Different top-fill mechanisms include:
- A screw-off cap
- A sliding cap
- A push-to-open cap
- A rotating cap
- A hinged lid
Follow any arrows or markings on the tank. Do not apply excessive force if the cap does not open easily.
Step 3: Identify the Filling Port
Locate the e-liquid inlet. It may be a small open slot or a silicone-covered port.
Do not confuse the filling port with the central airflow chimney. The chimney is usually an open tube running through the middle of the tank.
E-liquid entering the chimney can cause:
- Gurgling
- Spitting
- Liquid in the mouthpiece
- Leakage through the airflow holes
Step 4: Add the E-Liquid Slowly
Insert the bottle nozzle into the filling port and slowly squeeze the bottle.
Tilt the device slightly if necessary, but avoid getting liquid into the central airway. Watch the level through the glass and stop at the maximum fill line.
If the tank has no marked line, leave a small air gap at the top. Overfilling can increase pressure and push e-liquid into the airflow system.
Step 5: Close the Tank
Remove the bottle nozzle, wipe away any excess liquid and securely close the top cap.
Check that the silicone seal is properly positioned. A displaced or damaged seal can cause leaking.
Step 6: Wait Before Vaping
If you are only topping up a tank with an already saturated coil, a long waiting period is usually unnecessary.
If you have installed a new coil, allow it to absorb e-liquid for approximately five to ten minutes before using the device.
How to Refill a Bottom-Fill Vape Tank
Bottom-fill tanks must be removed from the vape before the e-liquid can be added.
Step 1: Turn Off the Device
Switch off the vape and remove the tank from the battery or mod.
Keep the tank upright until you are ready to turn it over. This reduces the chance of liquid entering the centre tube.
Step 2: Turn the Tank Upside Down
Hold the tank with the mouthpiece facing downward. Unscrew the base carefully.
If there is still e-liquid inside, keep the tank inverted throughout the process to prevent spilling.
Step 3: Inspect the Coil and Seals
Check that the coil is securely attached to the base. Inspect the rubber O-rings for damage, twisting or dirt.
A damaged O-ring may prevent the tank from sealing properly.
Step 4: Add E-Liquid Along the Outer Wall
Place the e-liquid nozzle between the outer wall and central chimney. Slowly add liquid until it reaches the indicated fill line.
Do not pour e-liquid into the central tube and do not overfill the tank.
Step 5: Reassemble the Tank
Screw the base back into place while keeping the tank inverted. Tighten it until secure, but do not overtighten the threads.
Turn the tank upright, wipe away any liquid and reconnect it to the vape.
Step 6: Allow the Coil to Saturate
If a new coil was installed, wait five to ten minutes before vaping. Begin at the lower end of the coil’s recommended power range and increase the wattage gradually if necessary.
How to Refill a Vape Pod
Refillable pods are usually simpler than traditional multi-part vape tanks.
Step 1: Remove the Pod
Turn off the device if it has a power button. Pull the pod gently from the battery section.
Avoid squeezing the pod because this can force liquid into the airflow chamber.
Step 2: Find the Filling Port
Common pod filling systems include:
- A rubber plug on the side
- A rubber plug on the bottom
- A removable mouthpiece
- A sliding top-fill section
- A silicone membrane valve
Open only the designated filling port. Do not add liquid through the mouthpiece or airflow hole.
Step 3: Add E-Liquid
Place the bottle nozzle into the filling opening and add the e-liquid slowly.
If the pod has more than one opening, one may be an airflow vent rather than the filling port. Refer to the product manual when uncertain.
Leave a small amount of air inside the pod. Filling it completely to the top can increase the likelihood of leaking or flooding.
Step 4: Seal the Pod
Replace the rubber plug and press around its edges to make sure it is completely closed.
Wipe the bottom of the pod before reinstalling it. E-liquid around the electrical contacts can interfere with the connection between the pod and battery.
Step 5: Reinstall the Pod
Insert the pod in the correct orientation. Many models use magnets and will click into position.
If you have installed a new pod or the wick was dry, wait approximately five to ten minutes before vaping.
How to Prime a New Vape Coil
Priming means saturating a new coil’s wick with e-liquid before it is heated for the first time.
A dry wick can burn immediately when power is applied. Once the cotton has burned, the unpleasant taste may remain even after more liquid is added.
Priming a Replaceable Tank Coil
Follow these steps when the coil design allows manual priming:
- Remove the new coil from its packaging.
- Place a small amount of e-liquid on each visible cotton opening.
- Avoid pouring liquid through the centre airway.
- Install the coil securely.
- Fill and close the tank.
- Wait five to ten minutes.
- Start at the lower end of the recommended wattage range.
Do not oversaturate the coil. Adding too much liquid directly to the wick can flood its central chamber and cause gurgling or spitback.
Priming a Pod with a Built-In Coil
Do not attempt to pull apart a pod with a sealed built-in coil.
Fill the pod through its designated port, close it and let it stand upright for five to ten minutes. This allows the internal wick to absorb the e-liquid naturally.
How to Clean a Vape Tank Before Refilling
Cleaning is helpful when changing flavours or when residue has accumulated inside the tank.
Cleaning a Tank with Removable Parts
- Turn off the device and remove the tank.
- Empty any remaining e-liquid responsibly.
- Disassemble the tank according to its instructions.
- Remove the coil and keep it separate.
- Rinse washable glass and metal parts with warm water.
- Allow every part to dry completely.
- Reassemble the tank with a suitable coil.
Never rinse the battery, electronic mod, charging port or other electrical components with water.
Should You Wash a Vape Coil?
Replaceable coils generally should not be washed as part of routine maintenance. Water trapped inside the wick may affect performance and could take a long time to evaporate.
If a coil tastes burnt or performs poorly, replacing it is usually more reliable than attempting to clean it.
Changing E-Liquid Flavours
A small amount of the previous flavour may remain in the wick even after cleaning the tank.
When moving between similar flavours, this temporary mixture may disappear after several puffs. When changing between very different flavours, replacing the coil may produce a cleaner result.
Common Vape Refilling Mistakes
Filling the Airflow Tube
Putting e-liquid into the central chimney can cause gurgling and liquid spitback. Always use the marked filling port.
Overfilling the Tank or Pod
Leave a small air gap. Overfilling can create excess pressure and force liquid through the coil or airflow openings.
Vaping Immediately After Installing a New Coil
A new coil requires time to absorb e-liquid. Firing it too soon can burn the dry wick.
Leaving the Filling Plug Open
A partially closed silicone plug can allow e-liquid to escape, especially when the device is carried in a pocket or bag.
Using the Wrong E-Liquid
An unsuitable VG/PG ratio can cause either leaking or poor wicking. Check the recommended liquid type for the device and coil.
Overtightening the Tank
Excessive force can damage threads, compress seals and make the tank difficult to reopen.
Refilling a Sealed Prefilled Pod
Prefilled pods are not necessarily designed to be opened. Forcing one apart can damage the seal and lead to uncontrolled leaking.
Why Is My Vape Leaking After a Refill?
A vape may leak after filling for several reasons.
| Possible cause | Recommended action |
|---|---|
| Tank or pod overfilled | Remove a small amount of e-liquid |
| E-liquid entered airflow tube | Clean the chimney and mouthpiece |
| Filling plug not fully closed | Reseat the silicone plug |
| Coil loose or misaligned | Reinstall the coil correctly |
| O-ring damaged | Replace the damaged seal |
| E-liquid too thin | Check the recommended VG/PG ratio |
| Coil worn out | Install a replacement coil |
| Tank left in heat or direct sunlight | Store upright in a cool location |
If leaking continues after these checks, stop using the device and consult the retailer or manufacturer.
Why Does My Vape Gurgle After Refilling?
Gurgling usually means too much e-liquid has entered the coil chamber or airflow system.
Possible causes include:
- Overfilling
- Adding liquid to the central chimney
- Excessively priming the coil
- Using e-liquid that is too thin
- Inhaling too forcefully
- A loose coil or damaged seal
Turn off the device and remove it from your mouth before cleaning. Wipe the mouthpiece and accessible airflow areas with a tissue. Follow the manufacturer’s instructions for clearing a flooded coil.
Vape Refilling Safety Tips
- Use only compatible e-liquid.
- Keep nicotine e-liquid away from children and pets.
- Do not refill while the device is firing.
- Never add e-liquid through the mouthpiece unless the instructions specifically identify it as the filling mechanism.
- Do not use cracked tanks or damaged pods.
- Clean e-liquid from electrical contacts before use.
- Never rinse the battery or charging port.
- Do not use a device with a damaged battery.
- Store the vape upright when possible.
- Follow local laws concerning nicotine strength, bottle size and product authorization.
In the United States, the rules concern whether individual tobacco products have the required FDA marketing authorization; there is not a universal federal ban on every prefilled pod. FDA tobacco product marketing orders
In the UK, reusable vapes may be refilled with bottled e-liquid or compatible replacement pods, provided the products meet applicable requirements. Single-use vapes have been prohibited from sale and supply since 1 June 2025. UK single-use vape guidance
Frequently Asked Questions
How do I know where to put e-liquid in my vape?
Look for a filling port beneath the top cap or behind a rubber plug. Do not put e-liquid into the central airflow tube. Check the manual if the filling port is not clearly marked.
How full should I fill my vape tank?
Fill only to the maximum line and leave a small air gap at the top. Do not fill the chamber to the point where liquid spills from the opening.
How long should I wait after refilling a vape?
If the coil is already wet and you are only topping up the tank, little or no waiting time may be required. After installing a new coil or dry pod, wait approximately five to ten minutes.
Can I refill a prefilled pod?
Only refill a pod if the manufacturer identifies it as refillable. Do not force open or modify a sealed prefilled pod.
Can I mix two vape juice flavours in one tank?
Compatible e-liquids can physically be mixed, but the resulting flavour and nicotine strength may be unpredictable. Avoid combining liquids with significantly different formulations unless the device manufacturer confirms compatibility.
Why does my vape taste burnt after refilling?
The coil may already be damaged, the wick may not be fully saturated, or the power setting may be too high. Stop vaping, check the liquid level and allow the coil to soak. Replace it if the burnt taste remains.
Do I need to replace the coil every time I refill?
No. A coil can normally be used for multiple refills. Replace it when flavour and vapour decline, leaking becomes persistent or a burnt taste develops.
Can I use any e-liquid in a refillable pod?
No. Use an e-liquid with a nicotine strength and VG/PG ratio suitable for the device. Small pod systems and powerful sub-ohm tanks often require different formulations.
Conclusion
Learning how to refill a vape tank or pod correctly can prevent leaking, burnt coils, flavour contamination and unnecessary device damage.
The most important steps are to identify the correct filling port, avoid the central airflow tube, leave a small air gap and allow a new coil enough time to absorb the e-liquid.
Because filling systems vary, the manufacturer’s instructions should always take priority over general guidance. When a tank, pod, seal or battery is damaged, stop using the device instead of attempting an unsafe repair.
Disclaimer: This content is provided for general educational purposes and is intended only for adults of legal vaping age. Nicotine is addictive. Vaping products are not risk-free, and people who do not use tobacco or nicotine products should not start.